Clipping Editor

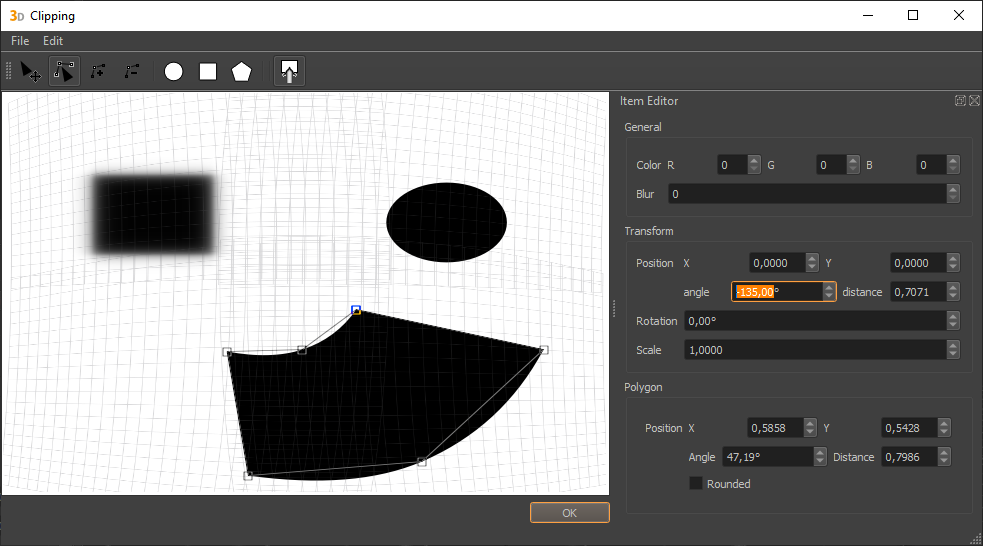
The Clipping Editor is used for vector based drawing of clipping images. The data is stored resolution independent and can be exported in varying resolutions. It supports a live-preview on the actual projection using the PatternGenerator.
Create and delete Shapes
- Add Shapes:
Using the toolbar, new shapes can be placed. Click the circle, rectangle, or polygon to place the corresponding form on the drawing canvas.
- Add Circle

C Click on the image to create new circles.
- Add Rectangle

R Click on the image to create new rectangles.
- Add Polygon

P Set the corners of the polygon by clicking on the image.
- Add Circle
- Delete Selected Items
Delete Selected Shapes can be deleted by pressing the ”del”-key or through the menu item .
- Clear Scene (Ctrl-N)
The complete scene can be cleared to white through the menu item .
Edit Shapes
- Edit Items

V Left-Mouse-ButtonSelect and move shapes on the canvas
Middle-Mouse-ButtonStretch circles and rectangles
Right-Mouse-ButtonProportional scale of circles and rectangles
- Edit Polygons
When a polygonal shape is selected, additional editing options are available:
- Edit Points

A Select and drag polygon vertices to adjust their position. (Arrow-Keys) can be used as well for moving.
,and.select previous or next adjacent vertex.- Add Points

+ Click on any polygon edge to add a vertex. While mouse is still pressed, position of currently added vertex can be corrected.
- Remove Points

- Click on vertices to remove them.
- Edit Points
Colors
The clipping is defined through the color of the background and the color of the shapes. Black areas are clipped out from the projection. By default the background is white and created shapes are black, so that the created shapes cut out parts from the projection.
- Invert Scene
Ctrl-I - The complete clipping can be inverted using
- Set Item Color…
- The color of currently selected shapes can be changed using
- Set Item Background Color…
- The background color can be changed using
Blur
Shapes can be blurred, to get soft edges in the clipping export.
- Set Item Blur…:
The blur of currently selected shapes can be changed using
Menu > Edit > Set Item Blur...Note
The effect of blur is currently not shown in the live-preview on the real screen.
Item Editor
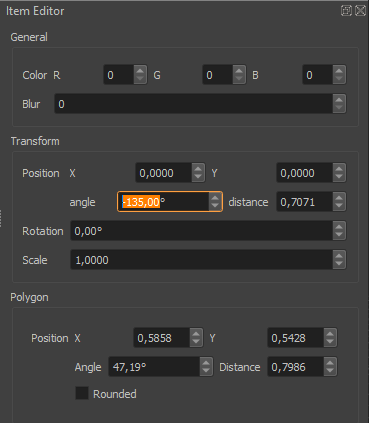
The Item Editor allows to precisely adjust all aspects of the clipping items through numerical input fields.

- General
General settings. Adjustable for all shapes.
- Color
Defined as R G B components (range 0-255)
- Blur
range 0-99; 0 = off
- Transform
Transform (adjustable for all shapes): the position of an item can be adjusted numerical in two variants.
- Position X/Y
Item position as Cartesian coordinate x and y (the canvas ranges from 0,0 top left to 1,1 bottom right corner; 0.5,0.5 is the center of the canvas)
- Position angle/distance
Item position as polar coordinate angle (counter clockwise) and distance (from canvas center)
- Rotation
Item rotation in degrees, clockwise.
- Scale
Item scale
- Shape Type specific
The third section contains specific parameters depending on the current shape type (rectangle, circle or polygon).
- Width / Height
Width and height of rectangle or ellipse items.
- X/Y
Vertex position as Cartesian coordinate x and y relative to item origin.
- Angle/distance
Vertex position as polar coordinate angle (counter clockwise) and distance (from item origin).
- Rounded
Allows to select between sharp corner or smooth curve passing through a vertex.
Load and Save
The clipping data is stored along with the Mapper3d project file. But there is an option to explicitly store the clipping data in an extra xml-file (export) and load clipping data from such a file. This way you can transfer clippings from one project to an other, or make backups of different versions of your clipping.
Export Image
The clippingEditor allows to export images in an arbitrary resolution.
This allows you to manipulate the clipping-image in any image manipulation software. You can use your manipulated image for clipping in Mapper2d and Mapper3d (see section Shading).
Live Preview
Started from Mapper, Clipping Editor supports a live-preview on the real projection using the PatternGenerator. Live-preview can be toggled using Clipping Editors main-toolbar.