Viewpoint
After a calibration, a basic project for the Mapper3d is created. While the screen points are all calculated and the screen is set up, the viewpoint still has to be adjusted.
A viewpoint contains view informations (camera positions, offsets and frustum settings) for each projection channel which are later used in 3D engines to render a part of the 3d scene for each individual channel.
Configure a viewpoint
In the beginning all cameras are placed at the origin and have no orientation. In order to get a correct perspective these cameras / views need to be placed in the designed eyepoint, the position where the viewers head will be placed in the projection system. To cover the complete screen the rotation offsets and frustum settings of each view need to be adjusted to point at and cover the corresponding projection channel.
To change the viewpoint, switch into the 3d view and select all projectors in the projectors list. This allows to adjust the view for all projectors at once and the changes can be seen in the 3d view.
First adjust the view position using Projectors/View/Transform/Position, according to the physical setup.
After the position is adjusted, the orientation and frustum settings of
cameras can be setup automatically using Projectors/View/Guess or Extras/Guess Frusti....
According to selected options this will update camera orientations and their field of view to
look through their corresponding projection area.
Usually this gives already a valid camera setting. But further finetuning is still possible by manually overriding all the camera parameters (see section View settings). For example most hardware warp units can’t rotate the image by 180 degrees. In this case the bank value needs to be adjusted to reduce the required warping.
The used field of view is also of interest for the final effective resolution of the projection system.
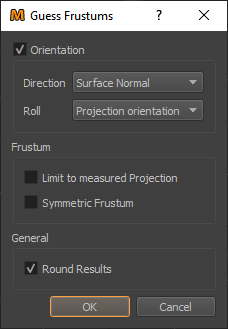
Guess Frusti
Automatically generate frustum settings for currently selected viewpoint.

Guess Frusti Dialog
- Orientation
Updates viewpoint orientation(rotation), when enabled
- Direction
Two options are available for adjusting views heading and pitch:
- Surface Normal
Adjusts heading and pitch, so that view points perpendicular to surface.
- Point at Center
Adjusts heading and pitch, so that view points at center of projection channel.
- Roll
Two options are available for adjusting views roll(bank).
- Unrotated
Keep a roll of 0°.
- Projection Orientation
Adjusts roll(bank), to be aligned with projection.
- Limit to measured Projection
Sometimes projectors can go far beyond screen borders. This setting allows to keep the frustum small, encompassing only the measured area of a projector.
- Symmetric Frustum
Some 3D-Engines have restrictions, for the frustum. This setting allows to enforce a symmetric frustum.
- Round Results
Generate more easy to read and manually transfer values, by rounding to integer numbers.