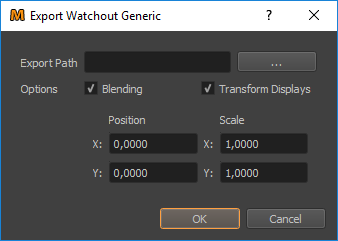
Export Watchout
The WATCHOUT Generic exporter allows to export warping and blending data for Dataton Watchout based on generic export formats.
Watchout 2D Display/Projector and 3D Mapping Projector are supported. Use Mapper2d for 2D exports, Mapper3d for 3D exports and MapperPM for projection mapping exports.
The exported data can be imported by Watchout as Display/Projector setup.
Requirements:
Requires Watchout 6.2 or newer
Unrotated cutting rectangles recommended for non-dome setups
Export Settings

- Export Path
A folder where the exported files should be saved. This folder should exist.
- Blending
Export blending information. This includes clipping, fadeout and uniformity information as well.
- Transform Displays
For scaling the projector layout to fit a desired content size, enable the Transform option. Please be aware, that there is another position and scaling option during import into Watchout, which will add to the transformation defined here.
- Position x/y
Defines the offset of the whole projector arrangement from the origin in the normalized mapping space.
- Scale x/y
Defines the scaling of the normalized mapping space. Enter the X/Y dimension of the desired media content. Non-uniform scaling is supported for unrotated cutting rectangles only.
Import Data in Watchout
Import the projector setup at once into WatchOut Production by utilizing .
The following dialog shows up:

- File/Folder
Select the folder, where the Mapper2d export data is saved.
- Display scale factor
The display scale factor converts the normalized mapping space of the Mapper2d to pixel values in WatchOut, 1000 is the default. This is multiplied by the scale factor defined in Watchout Generic export. If you scaled up the export already set this to 1.
- Display offset x,y
Defines the offset of the imported projector setup in pixel from the origin. This is added to the offset defined in Watchout Generic export.
The projection setup will be loaded and the warping and blending files are automatically applied to the displays (see Figure 2). All blending files are then visible in the Media section.
Preparation for Stage Online
Before enabling the online stage, make sure to go through the following steps:
Correct content placement: Set the Anchor Position of the content to Top Left and enter the same X/Y values as Initial Stage Position that were used as Display offset during import. In the example for the 4k dome, a 4000x4000 pixel test image is placed with its top left corner at 1000,1000 to match the imported display layout.
Connect each Display to the corresponding output channel on the media server. This option is available in the display .
Enable blending for each display. This option is available in . Untick the enabled field and tick it again.
Automatic Updates of Correction Data
It is possible to automatically update the correction data in watchout, by just exporting new correction files from Mapper2d or Mapper3d. However this requires some additional settings in Watchout.
must be set to automatic.
needs to be enabled.
With these settings, Watchout recognizes, when the calibration files on disk where rewritten and automatically applies the new correction data.
Known issues
On import the blending mask is applied and enabled, but it must be re-enabled in to have an actual effect.
When changing/updating a blend file the old blend mask must be deleted by hand in . The new file must be applied by dragging and dropping it in the mask preview area. Otherwise the new blend file might be correctly shown in the mask preview, but the old file will still be used for blending.
Automatic updates in watchout currently have problems with updating the display informations, so do not override the cutting and frustum files for automatic updates, for example by exporting in a different folder than is used by Watchout for loading the correction data and than copying the data except cutting and frustum files with a batch-script to the folder used by Watchout.
Further glitches during automatic updates might be overcome by not updating all files at once, but with a delay after each file.
Presplit Video
The importand thing about presplit video in combination with Mapper2d is that cutting-rectangles must match presplit. The displays could even look stretched on WATCHOUT stage and the result on screen will still match.
Presplit Video with defined overlap
Presplit video is often cut in a simple horizontal or vertical layout with constant overlap between projectors. Mapper2d can generate such kind of cutting-rectangles with .
The cutting-rectangles can also be edited by hand. The auto-generate feature must be disabled for user defined cutting rectangles (disable “Auto Generate” below projector list in cutting-tab).
Arbitrary presplit Video generated with Cutter
If the video-material is not yet presplit you can use the Cutter to cut the source images according to the cutting rectangles shown in Mapper2d. Cutter can cut image-sequences, producing multiple sub-image-sequences (one per projector) which can be used to encode a video-file for each projector with video-editing software.
The Cutter needs information about the cutting-rectangles which can be exported through.