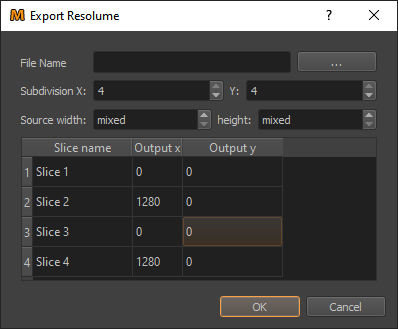
Export Resolume
The Resolume Exporter allows to export warping into Resolume Arena (Tested on version 7.1).
The blending is calculated by Resolume, so for exact blending results, the cutting in Mapper2d needs to be unrotated and within projectors.
The data exchange is done by patching slices with matching names in Resolume Advanced Output Preset (Resolume slice name = ProjectionTools projector name).
The slice input region is defined by current mappings shading resolution and each projectors cutting setup.
Export Settings

- File Name:
A Resolume Arena Advanced Output Preset to patch.
- Subdivision X/Y:
Resolume subdivision level. Best quality achieved on highest setting. When there are performance issues in Resolume, reduce subdivison level here or afterwards in Resolume.
- Source width/height:
Resolume input source resolution. When set to mixed, the source resolution is defined by mappings shading resolution associated with each channel. In standard projects with only one mapping, it is this mappings shading resolution.
- Slice name:
Assign the correct slice in Resolume Advanced Output Preset. Make sure that all slices have unique names in Resolume.
- Output x/y:
Optionally offset the slice in output. For example, when one display output of the computer is split for multiple projectors.
Workflow
Prepare an Advanced Output template in Resolume
- Create an Advanced output configuration, containing as much
slices, as needed.
Give each slice a unique name.
Save the configuration as Preset.
- Ensure all cuttings are unrotated, by either setting to unrotated
(default) or by using .
Export
- Select the previously exported Advanced Output Preset in the
Resolume exporter.
- Assign each ProjectionTools projection channel to the
corresponding resolume slice by entering the correct slice name.
- Adjust potential output offsets, in cases where multiple slices
are sharing one output. For example multiple projectors attached to one output of the computer using a splitter.
Run the export.
Import data into Resolume
Load the patched Preset in Resolume Advanced Output again.
Save and close Advanced Output editor.
Limitations
Due to limited blending capabilities in Resolume, projectors should be organized in a column/row fashion, and the cutting needs to be unrotated accordingly.
When multiple slices are sharing one output, the warping should be kept inside the projection channel to avoid overspill. This can be achieved by ensuring the cutting rectangles for each projector are kept inside the area covered for the projector in Mapper2D 2D view.
Sometimes, resolume does not reimport an Advanced Output Preset when it does not have a new name. In that case give a new name to the patched Preset before importing it again, or restart Resolume.
Image based Blending
Even though it is not officially supported, there is a workaround possible to bring image based blending into Resolume, using its layer mask functionality.
Preparation in Resolume
Create a layer for each channel
Put the content into each layer
Export
Use the generic exporter, to export shading as uncut 8bit png
Import data into Resolume
locate the blend files
- drag and drop the correct blend files onto its corresponding
layer, a mask selection will appear.
Choose luminance as blend mode